
New* – Updated 01/11/2022
Happy New Year to everyone. With the emergence of omicron, it’s time for me to update this post with yet a new mask that we are now using for our family. As much as the mask bands work, they are not something that kids can use throughout their school day. So, fortunately Hong Kong has come out with a mask that fits a wide majority of faces with a good fit, offers very high filtration, but also high breathability. In total, I have purchased over 20 different types/brands of masks and spend close to a thousand dollars on various masks. I have since settled on Savewo brand masks as the best in terms of fit, filtration, convenience and breathabilty, for the widest range of faces. The type of mask from Savewo that I would recommend are the 3D masks, which is a boat shape. (Side Note: At Apple, I’ve noticed the masks that they provide to their employees working in the office, is also a boat-shaped mask, similar to Savewo, though the material is slightly different.)
Here are links to procuring Savewo brand masks:
- Savewo Direct Worldwide (as of today, they are not shipping to several countries due to omicron)
- Taiwan-Masks (often sold-out of Savewo)
- Family-masks.com Ships from within the U.S. (My ordered arrived within a 5 days. Yay! They were kind enough to include a sample of one mask each of Small, Regular, Medium and Large, without me asking. Very nice.)
- Los Angeles Retail (If you are around LA, you could try Certlavie or Bright Vision Optometry)
- MikoPlace Savewo: They have a wide selection of Savewo masks, however they ship from HK, so I don’t know if they are also cramped by the above shipping limitations.
- Face Mask Trial Set: This is a great sampler pack of masks. I highly recommend this, so that you don’t have to spend hundreds like I did, to find something that fits well.
Want to check out their Nelson labs, NIOSH, KF94 and etc certificates? Here is the Savewo masks certificates page.
That’s it for this update! Good luck and stay healthy!
Updated 08/31/2021
With kids back to school, outfitting them with well-fitted and effective masks are important. This dad does his own testing on various masks and is the most helpful resource I have found. Much thanks to my friend, L, for sharing this information with me. In his video description, he shares his spreadsheet + photos of how masks fit on his 5yr old son (with eyes blurred for privacy).
Updated 08/13/2021
Updated 12/02/2020
My New Recommended Solution: Mask Brace by Fix the Mask
We use the Medium sized Essential Mask Brace for the adults in our household. I also have a few Small sizes which fit my children very well. I no longer have concerns finding masks that fit my kids now that I have this solution. Therefore, I have retired my old DIY mask making instructions, archived below.
I discovered this solution from a group I was following since early in the pandemic. When they launched a campaign on Kickstarter, Fix the Mask, I supported them. I have used my mask brace a while now and I feel this is a much safer solution than other solutions I have tried. I wholeheartedly recommend this to everyone.
How can I get the Essential Mask Brace by Fix the Mask?
You can purchase their mask braces at their online shop, fixthemask.com.
What surgical/medical masks can I use with it?
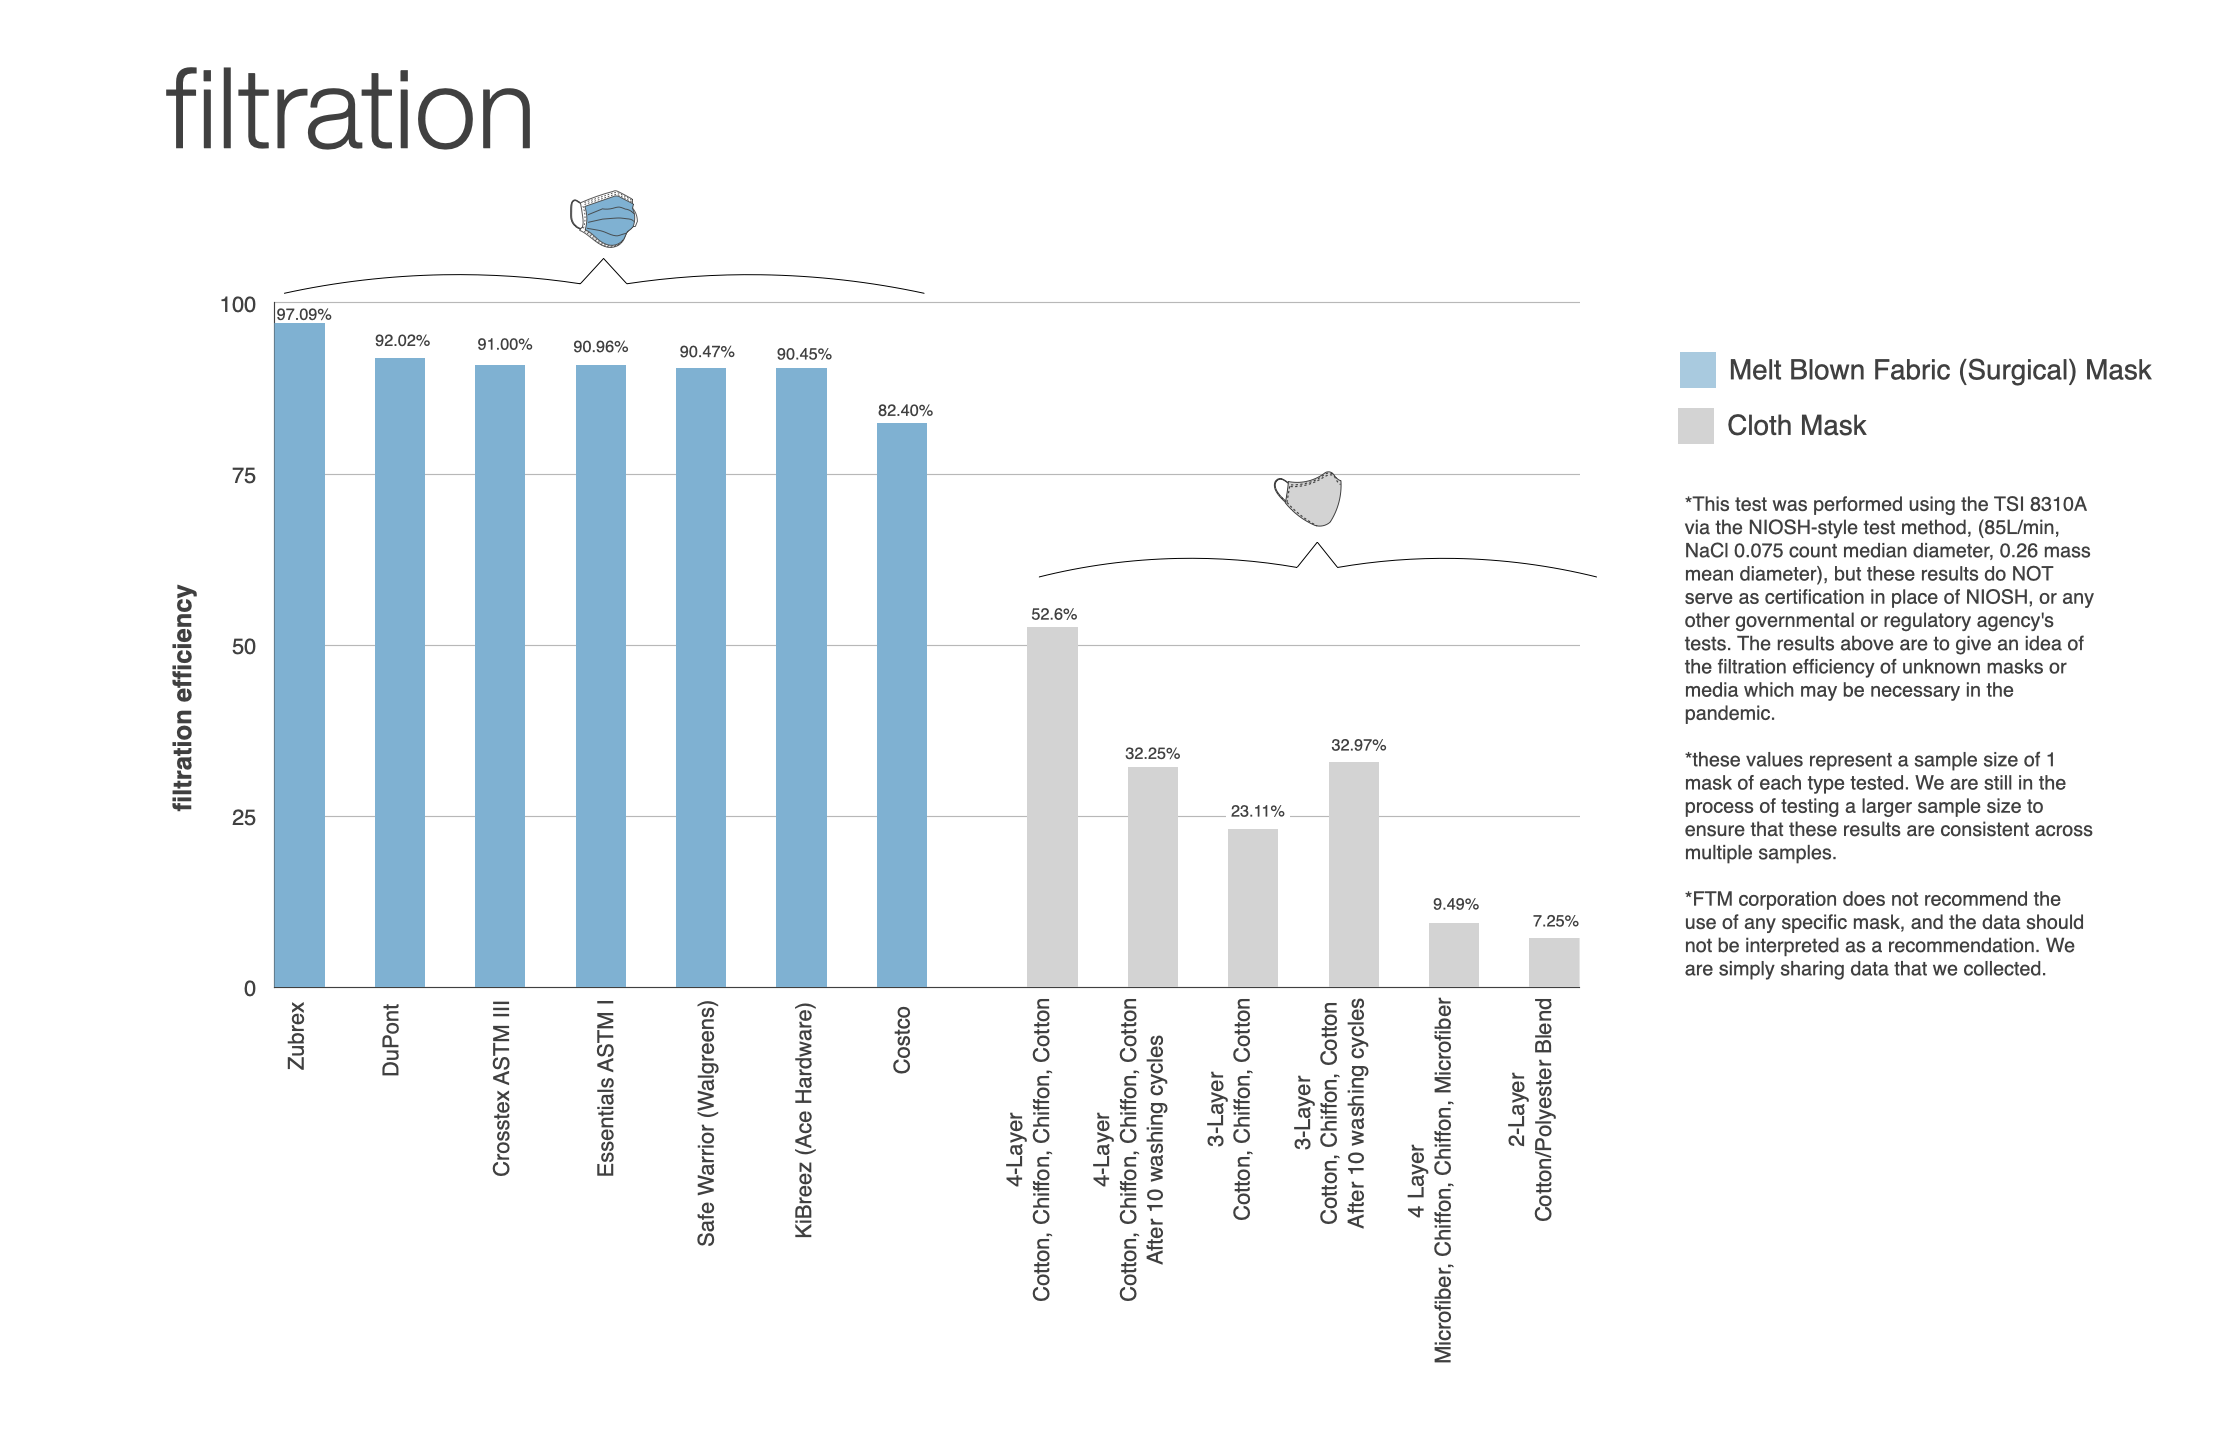
They recommend purchasing melt-blown fabric masks, such as medical masks, which can bring you very close to N95 safety standards in combination with the mask brace. The medical mask they recommend are the Zubrex masks which you can find on Amazon (pictured below). The blue Zubrex masks are more of a facial cover, so it will give better coverage than regular face masks (though regular face mask sizes worked fine for me, since I am on the smaller side).

How to wear the Essential Mask Brace by Fix the Mask?
Disposing of Medical/Surgical Masks?
Sadly, there is no way to recycle or dispose of these masks in an eco-friendly manner besides making sure you cut/snip the ear loops before disposal so that animals don’t become entangled in the strings.
Traveling during Covid?
If you have no choice, and must travel during this period, here is a helpful article written by the Fix The Mask group.
Watch the Interview with the Fix the Mask team and learn more about mask efficacy:
Updated 09/23/2020
Sharing some new information I learned:
- Cloth masks really are not that good. Not that good in terms of filtration and your ability to breath. Look at the cloth vs. meltblown article here.
- Check out this article for further details and image below:
Yes, I recently backed another project. This project is called the Essential Mask Brace. I will definitely update here once I get it and test it. In the meantime, you can read their collection of mask comparison and tech articles here. I really appreciate their work and their geekiness.
Taiwan’s FDA body has done tests and verified that using a rice cooker can disinfect a mask for re-use up to about 5 times (assuming there is no damage to the mask)
Microwaving masks is not advised as there are hot spots and cold spots using that method. In addition, masks come out burned in some areas.
CDC has recommended this method for sanitizing the Filti mask material, if you use Filti in your masks.
Fold the ends, pull the elastic and tie each end to make a smaller size mask for kids.
Those are standards from other countries outside of the United States and have been tested for their efficacy. I’ve included some screenshots from 3M’s Technical Bulletin below that will help you understand the differences. In the U.S., most of our healthcare workers are only allowed to use N95s, so please save those for our healthcare workers and try to use the other international versions, which are just as effective, though recently the US also approved the import of KN95 for use.


Click here to see the complete 3M Technical Bulletin PDF
Now that you have this knowledge, please be aware that there are also low grade/fake KN95s out there. Here is a good post on how to tell if your KN95 is low-grade/fake or authentic.
Over time this may be less of a worry as China has begun scrutinizing PPE exports after feedback of bad batches received overseas.
Updated: 12/2/2020
After months, someone finally came out with a much better solution (see above). A solution that I have adopted for my family and friends.
Therefore, I am archiving these DIY instructions below.
Instructions for new 6/11th version is now here.
Improvements of new version:
- Allows easy tightening/loosening on the fly
- Allows mask to be worn in head-loop style or ear-loop configuration
- Allows mask to be hung as necklace (via head-loop configuration)
- Allows filter removal + sanitizing for better re-use/safety
So what did we make and why?
- N95-like filtration: Filti material test results
- Inhalation safe: filtration material that is safe to breathe in
- Family sizes: kids size (~6yrs old) + adult size
- Sanitize/Re-usable
- Lightweight/cooler: single layer filti (+ optional light layer for cosmetic improvement)
- Easy On/Off + Comfort: swap between head-loops or ear-loops
- Easy to talk in
How do you make it?
Supplies:
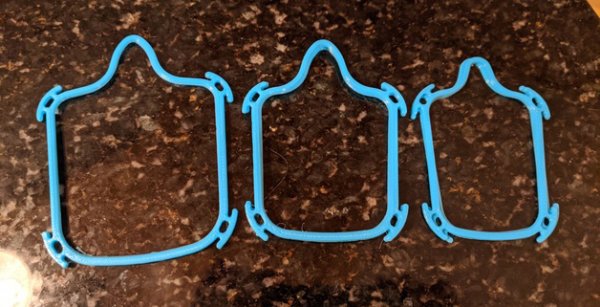
GardenTower Mask Frames
(incl. kids size and two adult sizes)
- Remove before sanitizing using rice cooker method (I shrunk mine that way, but now it fits my younger child even better)
- Credit to Suay Community Mask Coalition, Mask FAQ & this news article
- Filti Spec Sheet
- Sanitization: can be sanitized using rice cooker/oven method
Simple Method
(You can stop here if you just want a simple version and use the instructions on the right.)

- Pick your frame size
- Tie the elastic loops onto the frame using a slipknot, to adjust it while wearing. Top loop for head and bottom loop for neck. (Better than ear loops.)
- Cut out the Filti to fit your frame and wear it!
- Credit to RydgeTech for their videos to give me the idea of using the H100 + Filti + Impulse Sealer to DIY a mask (then I mixed in the mask frames)
- Sanitization: H100 melting point is 150C, so can be sanitized using rice cooker/oven method

We opted for the 8″

Elastic Cord* (updated 6/11)
My latest iteration uses this elastic cord that is softer and lies flat against the skin.

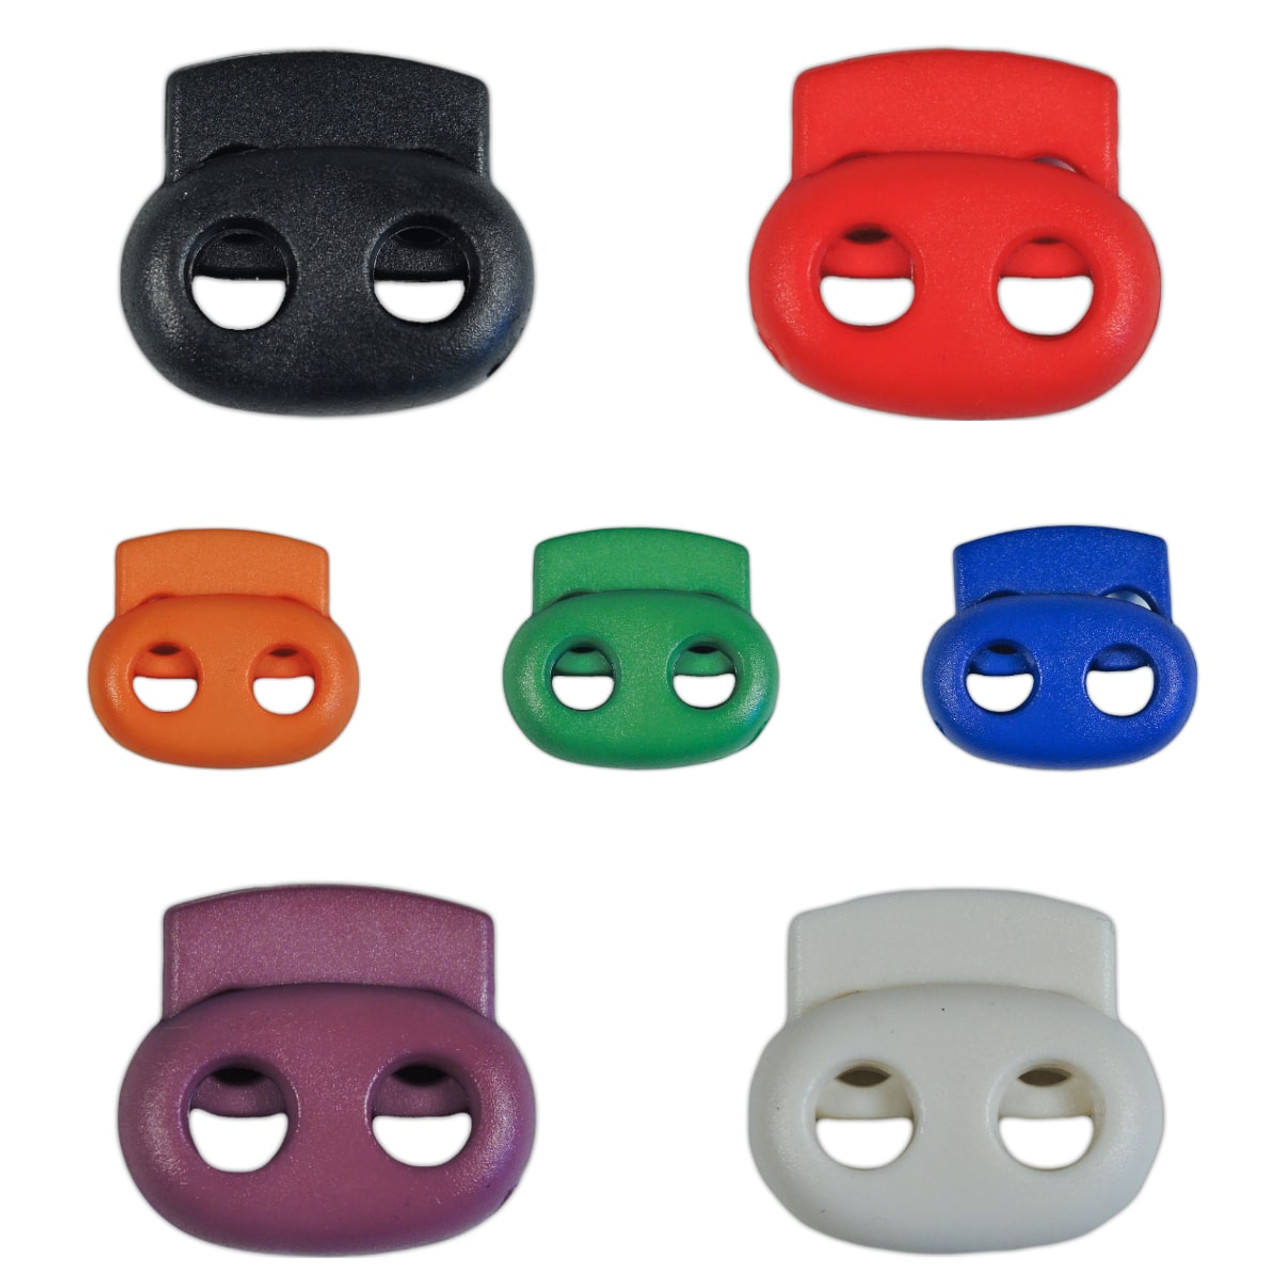
Cord Locks* (updated 6/11)
In order to work with the 5mm soft elastic cord, I had to switch to bean locks.
One pair per mask. (I got them in pairs of different colors so we can tell the masks apart in our family.)
Pre-Steps: (before you start, familiarize yourself with what you’ll be working with)
How do the Mask Frames work?
(Super easy, yes, but won’t the fabric just fall out when you take it off maybe for a sip of water? The video mentions you can use glue and I think that would be a viable option, just not the one I went with, but I might try that in the future.)
So does this Filti material really get me close to an N95 for a homemade solution?
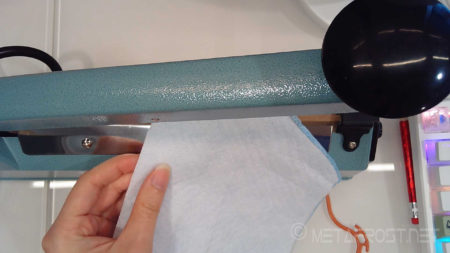
How to make a seal with the H100 and Filti?
(they used 8 on the impulse sealer, we ended up using 4)
Wait, which side is which for the Filti again?
Steps:
A. Template making:
A1. Place the Mask Frames over your face and choose your size.
A2. Place frame over a piece of paper (you are making a Template) and trace about 1-2 inches around it, using mostly straight lines. (Once you get more familiar you can take liberty and make your own adjustments.)
A3. Cut out your Template
B. Mask Piece Making:
B1. Place your Template over the H100, trace it and cut it.


B2. Place your Template over the Filti, trace it and cut it, using the same steps as above.
(If this is your first time, I recommend doing #B1 twice and skipping #B2 for when you are ready for the real thing. H100s are cheaper to test with.)

B3. Take your 1x H100 and 1x Filti (or 2x H100 if you are testing) and align them over each other. Make sure you know which side is in/out.

C. Sealing the Mask
C1. Stamp the 3 sides of your pieces using the Impulse Sealer. I used heat setting of 4.


D. Mask Frame Setup:
D1.(*New 6/11) I trimmed the protruding points off the mask frame because it would snag and tear apart the mask seal during use/filter sanitizing and replacement.

D2. I cut out two strings of elastic. The length will depend on your head. For my head I cut out 30 inches per string. It’s better to go longer where you can snip off extra, than to be too short.
D3. Now string the elastic (or the 5mm soft elastic if you got that) through the circles of each side of the frame.

From here on out, imagine the protruding parts have been trimmed off. I haven’t had a chance to redo all these photos yet.
E. Final Assembly/Re-use Assembly:
E1. Now carefully take the two ends of the elastic on one side of the mask and slip it through the sealed mask, then carefully wedge the mask into the center.


E2. Now use the Cord Locks (or Bean Cord Locks) to lock up the top strings and another for the bottom strings. If you want ear loop style, simply use the Cord Locks on the left strings and the right strings (instead of top/bottom strings).

That’s it! All done!
(Be sure to make a few more pieces of the sealed mask so you can quickly grab a new one to slip on when needed. And.. save that template. You can store your impulse sealer near the kitchen so you can use it to re-seal bags of chips, coffee and lego/toy packs when not making masks, or if you become an Amazon seller someday, you can use it to seal product packaging.)

Once you wear it, you should find that the mask frames make a pretty good seal on your face, pressing the Filti nicely against all sides of your face. The H100 acts sort of as a touch guard, ensures it doesn’t fall off or shift too much when putting on/removing and has better aesthetics by hiding the frame outline.
You could use the Simple Method (above) and use glue to attach the Filti directly onto the mask frame, so it doesn’t fall of when you need to remove it, but I imagine it might be difficult if you want to make some adjustments once it’s on your face. However I haven’t tried glueing and I think it’s worth a try too, for those inclined.
My friends, if you want to see a photo of me wearing one of these, ping me! I’m shy, so I’m not posting publicly online.
So how do I sanitize this thing?
Unofficial Method (my method):
Spray, spray from the awesome Flairosol spray bottle with HOCl and hang dry for next use.
Official Method:
- Remove one side of the frame elastic from the cord locks
- Slip the filter off
- Sanitize the sealed mask using either the Rice Cooker or Oven method (videos above).
- Remove after cooling
- Follow Step E to put it the sealed mask back on the mask frame.
I have successfully sanitized the H100 + Filti in my oven at 180F (since it doesn’t go lower than that) for 30 min, using the oven method above. I have also successfully sanitized those materials using the rice cooker method above too.